There’s a serious shortage of accommodations in the bird world these days. About 24 Canadian bird species nest in natural cavities such as holes in decaying trees and stumps. But it’s getting harder for them to find lodgings. Many potential homes are cut down for firewood or blown down in storms. Hectares of forests and woodlands are bulldozed to make way for subdivisions and other developments.
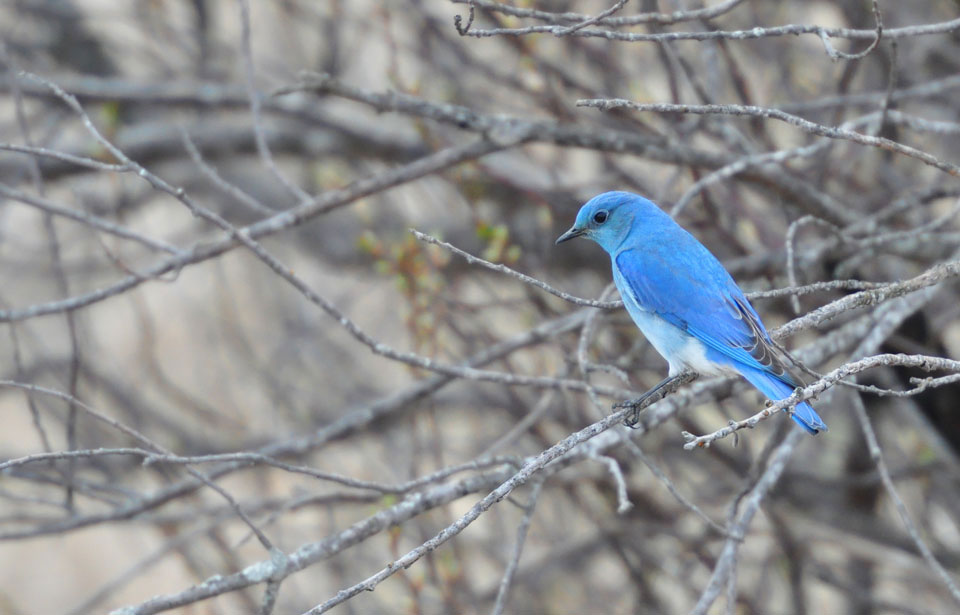
Nesting boxes around your community will be a real bonus for birds that raise their young in cavities. Many of these species settle comfortably into human-made dwellings. Some species, like the eastern bluebird, once declined seriously because of the dwindling number of natural cavities available to them, then rebounded because of nesting box programs organized throughout their range.
- To cut material costs, try building with leftover lumber. Or use any wood that resists weathering. Softwoods, particularly pines, are easy to work with. Avoid hard-woods, poplar, and basswood as they weather poorly. Lumber stock at least 2.5 cm (I”) thick will do. Create a natural log effect by using bits and pieces of wood with bark still attached. These slabs are less expensive and can be found in most sawmills and lumber yards. Never use pressure-treated lumber, as it can be toxic to wildlife.
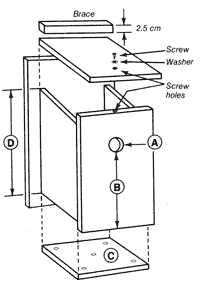
- The location of the bird box, its dimensions, the size of the entrance hole, and the height of the hole from the floor will vary, depending on the bird species you want to attract. For example, the entrance shouldn’t be any bigger than 2.5 cm in diameter if you want to attract wrens. Otherwise, sparrows or starlings may move in. On a larger scale, with a bigger entrance hole, the same basic design will attract nesting woodpeckers, screech-owls, and kestrels. Refer to the “Nesting Box Dimensions” table (below) for more details.
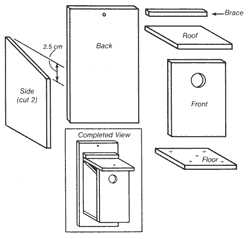
- After choosing the right dimensions, see the sample diagram (below). Cut one floor panel, one roof panel, two side panels, one back panel, and one front panel. Then assemble the panels according to the diagram.
- Use screws instead of nails to make it easier to correct mistakes. Five-cm (2″) coated flat-head screws are best. They’ll also allow you to open the hinged roof on one side of the box. That way, you can clean the box thoroughly every fall to get rid of parasites. Too many parasites can actually weaken and kill nestlings.
- Your box will last longer if the panels are held together not only with screws but also with bond-fast glue.
- Don’t attach a platform or perch outside the box. Otherwise, predators could raid the nest, or young birds might venture out of the box before they can fly.
- A nesting box made of dressed lumber must be treated with waterproof varnish to last many seasons. If you paint your box, use subdued brown, tan, or grey, as birds are more likely to be attracted to these colours.
- To darken and preserve a new pine box, mix a little green or brown oil-based paint with linseed oil. Don’t use lead-based alkyd paints or creosote wood preservatives and don’t treat the interior of the box with preservatives or paint.
- Drill a few small holes on the sides of the box, just below the roof overhang to allow air and a little light to filter in. A few holes drilled in the floor near the walls will let moisture drain out.
- Cover the entrance until it’s nesting time for the birds you hope to attract. Starlings and sparrows nest early and frequently take over boxes intended for other birds. They are also partly responsible for the decline of many cavity-nesting birds.
- Don’t put nesting materials inside the box — birds would much rather find their own. But you can help out by making materials available outside.
- The box will more likely be used if it’s placed on a pole, mounted on a tree-trunk, or suspended from a branch with a hook screwed into the roof.
- You can discourage unwanted visitors by putting a guard, such as a tin collar, around the trunk.
- Pick a spot that’s sunny at least part of the day. Turn the entrance away from the usual direction of wind and rain — birds don’t want a storm in their living-room!
- If you want to relocate a nesting box, fall is a good time. You may want to add a few new boxes or move old ones to better spots.
- Clean your nesting box each fall. That way, you ’II get rid of parasites and leave a spotless house for next spring’s family. It’s a good idea to wear a face mask (available at hardware stores) to avoid breathing fungi and parasites. Scrub your box with a stiff brush and pour boiling water through it for disinfecting purposes. An alternative is to disinfect the box by spraying the inside with pyrethrum insecticide containing 0.5 percent pyrethrin. This insecticide was originally made from dried chrysanthemums, but is now artificially made. It is very toxic to insects, but will not harm birds. As well, its effects don’t last long, which makes it safer for use in nature.
- For species like bluebirds, which sometimes nest twice in a summer, remember to houseclean between broods. Removing the first nest keeps adults from building another one on top of it. Otherwise, the new nest could be raised dangerously close to the entrance hole, making chicks easier prey for starlings or raccoons.
- Nests left in boxes over the winter will probably attract mice, which love to stuff the cavities with grass and other vegetation. Needless to say, birds are not likely to use such a box in spring.
- Check on a regular basis that the structure is in good repair.
- See that your box is mounted securely. Be sure the first heavy rain or windstorm won’t blow it down. An accident like that could wreck the house and kill nestlings.
- If the roof is loose, the bottom warped, or a side cracked, take it down for repairs. If it needs painting or staining, fall is the time to do it. Return the box to its place outside so it can weather all winter. When spring arrives, the smell of the paint or stain will have worn off.
Species | Entrance hole diameter | Height of hole above floor panels | Size of floor panels | Height of wall panels | Height above ground |
American kestrel | 7.5 | 31 | 25 x 25 | 40 | 6-9 |
Bluebirds | 4 | 15 | 13 x 13 | 20 | 2-3 |
Bufflehead | 6 | 30 | 15 x 15 | 37 | 3 |
Chickadees | 3 | 15 | 9 x 9 | 20 | 2-5 |
Downy woodpecker | 3 | 15 | 9 x 9 | 20 | 2-3.5 |
Flying squirrel | 3 | 15 | 10 x 14 | 20 | 3.5-4 |
Great crested flycatcher | 5 | 15 | 15 x 15 | 20 | 3-5 |
Grey and red squirrel | 7.5 (on side) | 50 | 25 x 28 | 60 | 6-9 |
Hairy woodpecker | 4 | 22-30 | 15 x 15 | 30-35 | 3-5 |
House wren | 2.5-3 | 10-15 | 10 x 10 | 15-20 | 2-3 |
Northern flicker | 6 | 35 | 15 x 15 | 40 | 2-5 |
Nuthatches | 3 | 15 | 9 x 9 | 20 | 2 |
Red-headed woodpecker | 5 | 25 | 15 x 15 | 30 | 3-6 |
Screech-owls | 7.5 | 31 | 20 x 20 | 40 | 4-9 |
Tree swallow | 4 | 15 | 13 x 13 | 20 | 2-3 |


